Learn how to solve common issues when recording audio with the Shootsta Kit 2. Please contact us if the issue persists.
In this article we will cover the following issues:
-
No audio being recorded
-
Changing batteries
-
Pairing your RX and TX
-
Changing audio levels
-
Not hearing any audio
-
Eliminating feedback
No Audio Being Recorded
There are a few reasons why you might not be recording any audio or why the audio levels on the back of your camera aren't working. Let's start with the most common ones.
Cords
Cords not plugged in correctly are a common cause of no audio being recorded. Check the following cords and inputs.
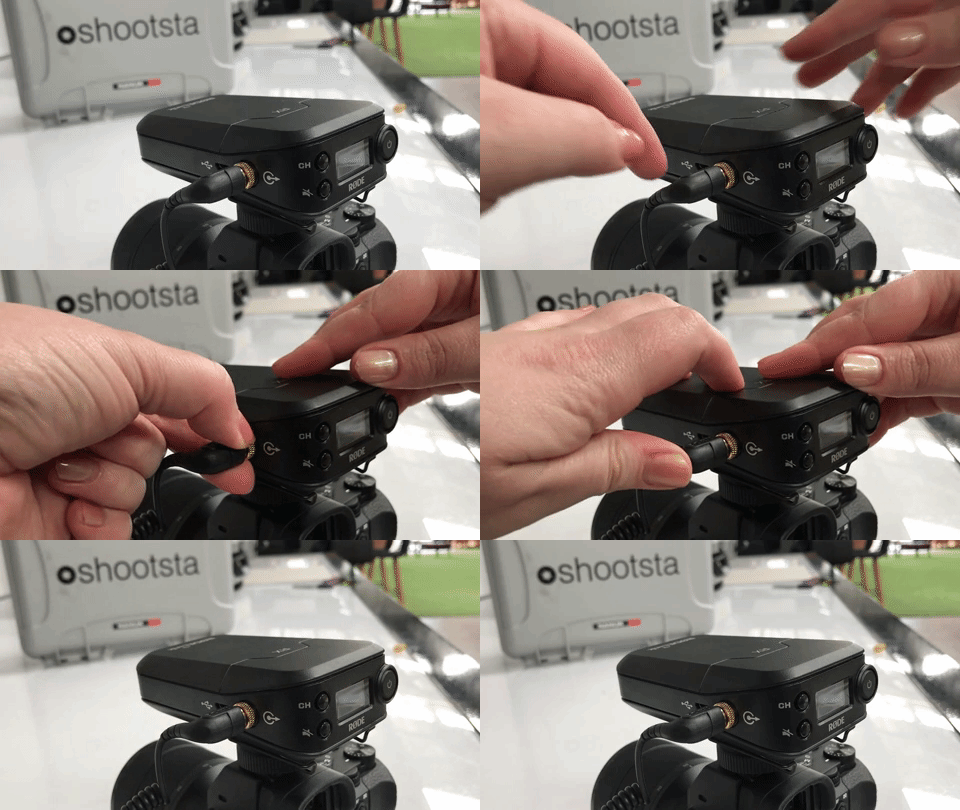
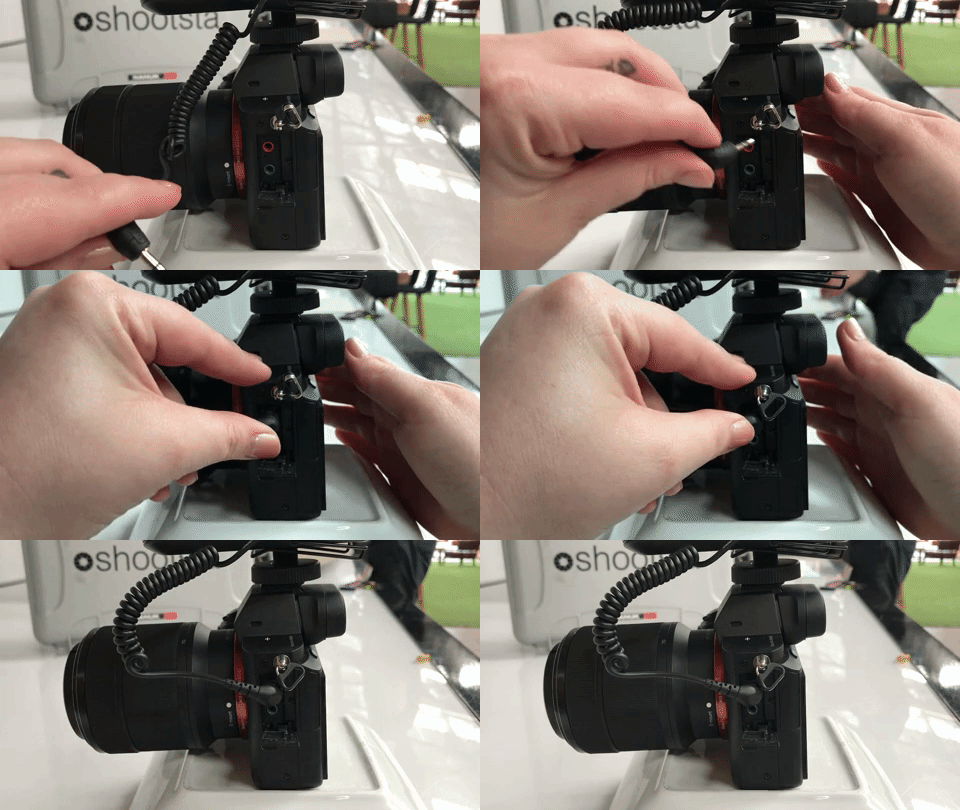
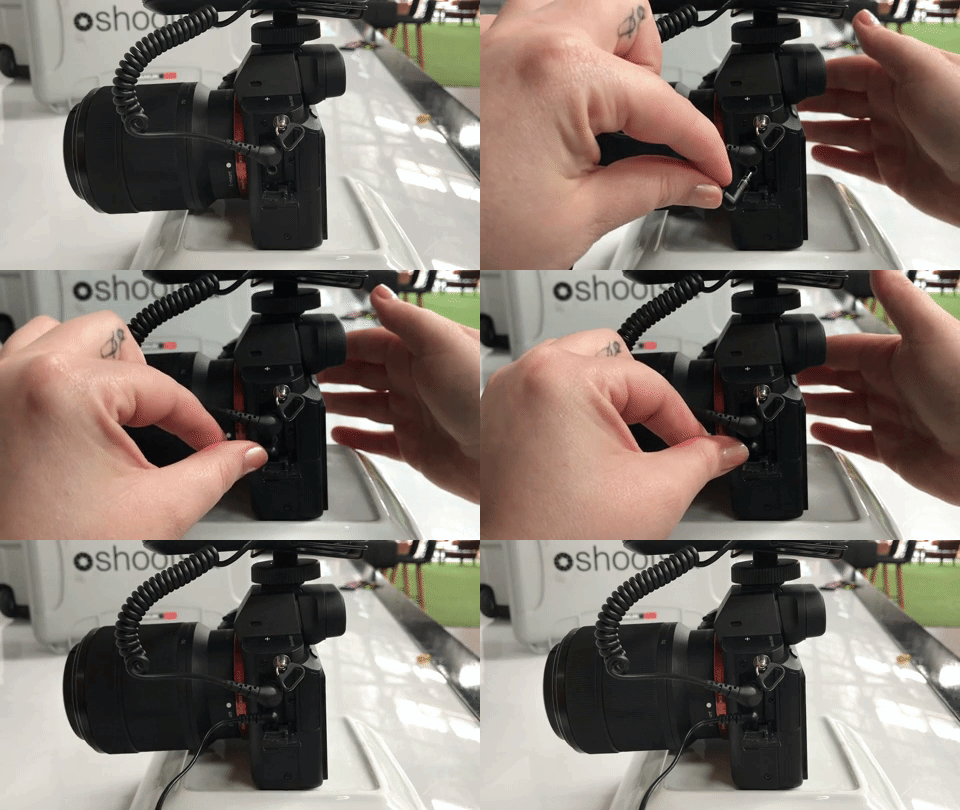
Coiled Cord - RX Receiver & Camera
-
Make sure the gold ring end of the cord is plugged into the receiver and tighten the ring.
-
Push firmly into red mic input on left side of the camera.
-
Do not stretch the cord!
-
If you see the audio bars on the Rodelink Receiver (RX) screen move (next to the battery icons) but no audio is being recorded despite the coilder cable being plugged into the camera, the camera settings may be the issue or it could be that this cable is damaged. Please get in touch for a replacement.
Make sure the gold ring end of the cord is plugged into the receiver and tighten the ring.
Push firmly into red mic input on left side of the camera.
Do not stretch the cord!
If you see the audio bars on the Rodelink Receiver (RX) screen move (next to the battery icons) but no audio is being recorded despite the coilder cable being plugged into the camera, the camera settings may be the issue or it could be that this cable is damaged. Please get in touch for a replacement.
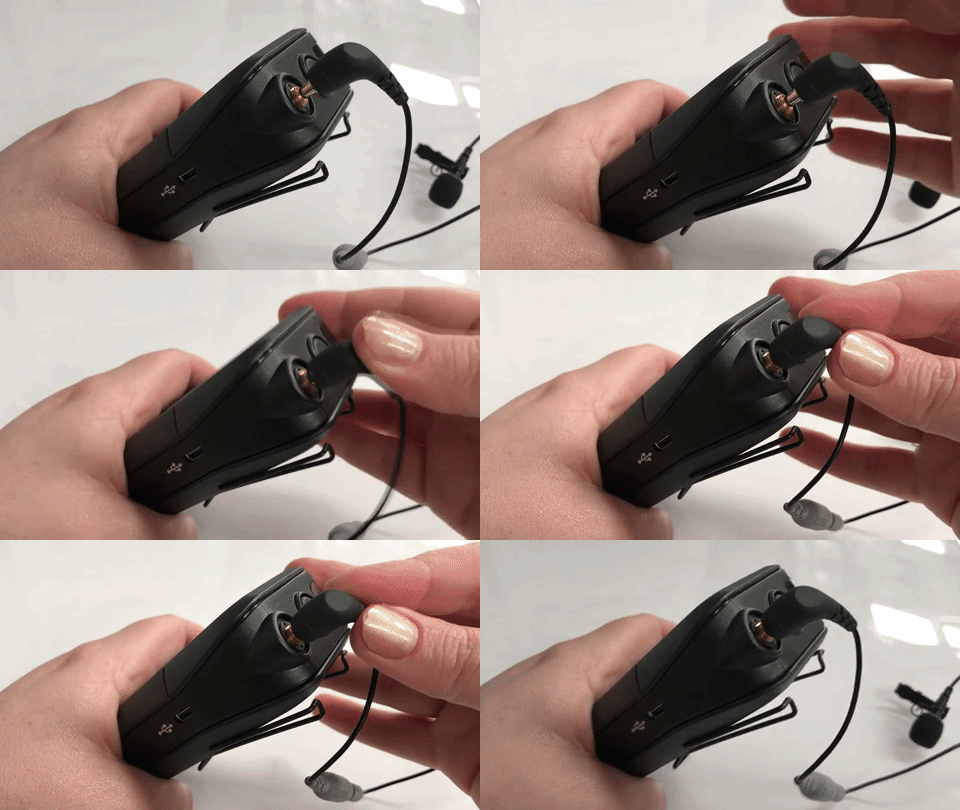
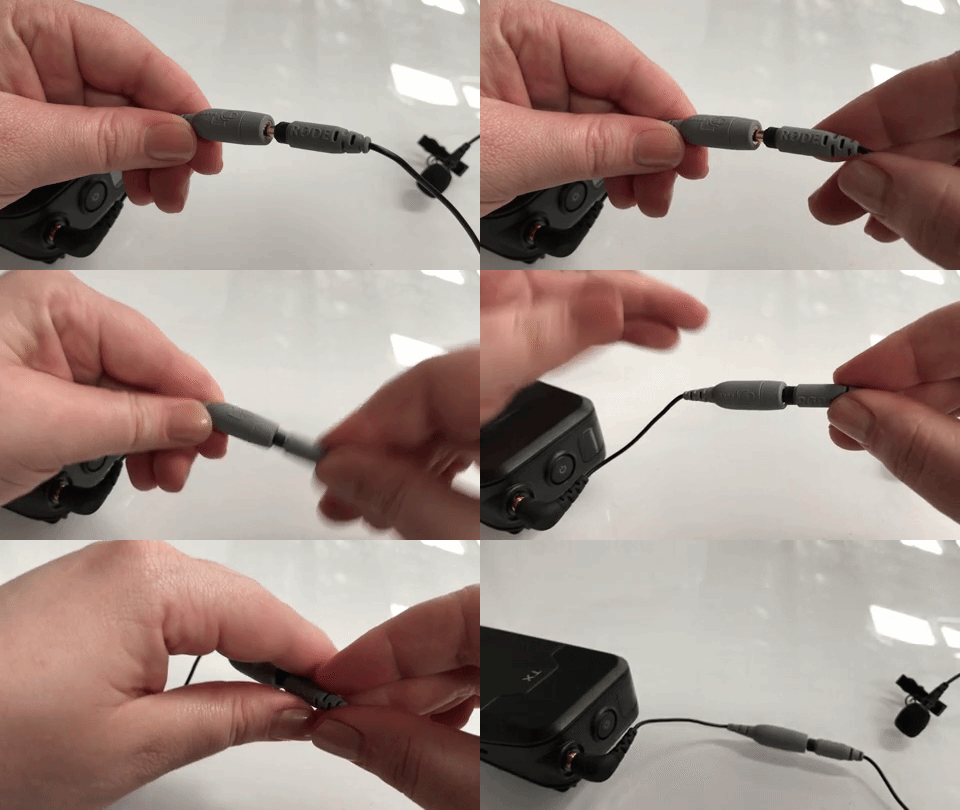
Lav Mic Cord and Adaptor Cord - TX Transmitter
-
Plug adaptor into transmitter input.
-
Plug mic firmly into adaptor input. If you are using a lav mic with a grey jack, make sure you are using the provided adaptor. If you don't, then you won't be recording any audio.
Headphones
Plug headphones firmly into the green input on the left side of the camera.
Mute - Receiver & Transmitter
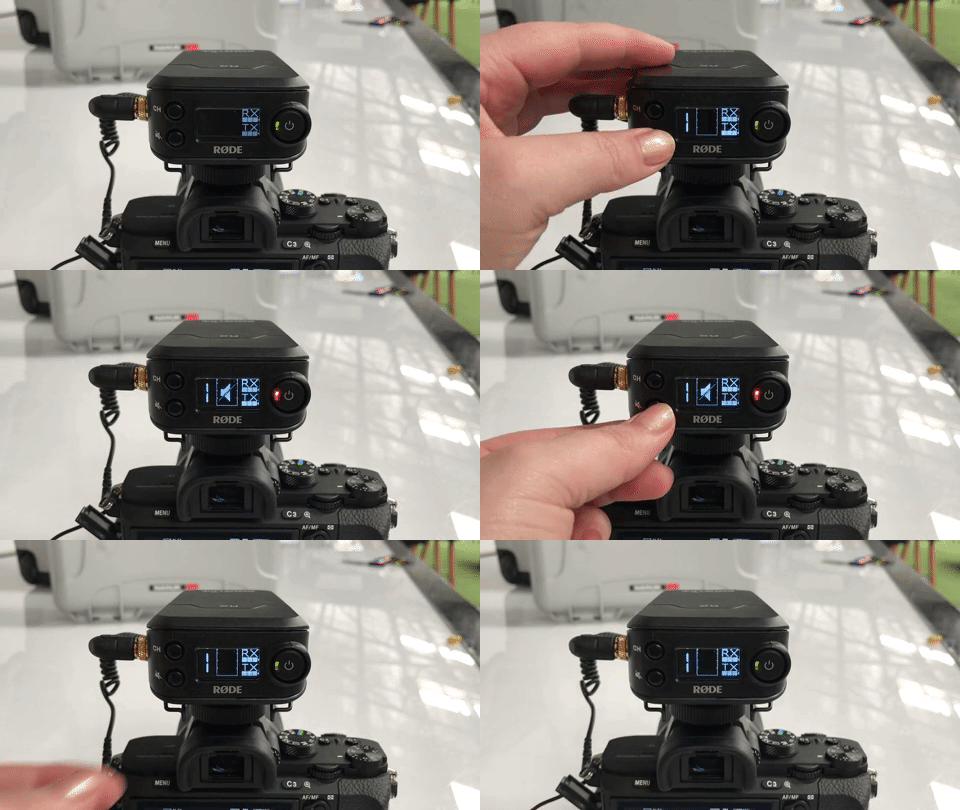
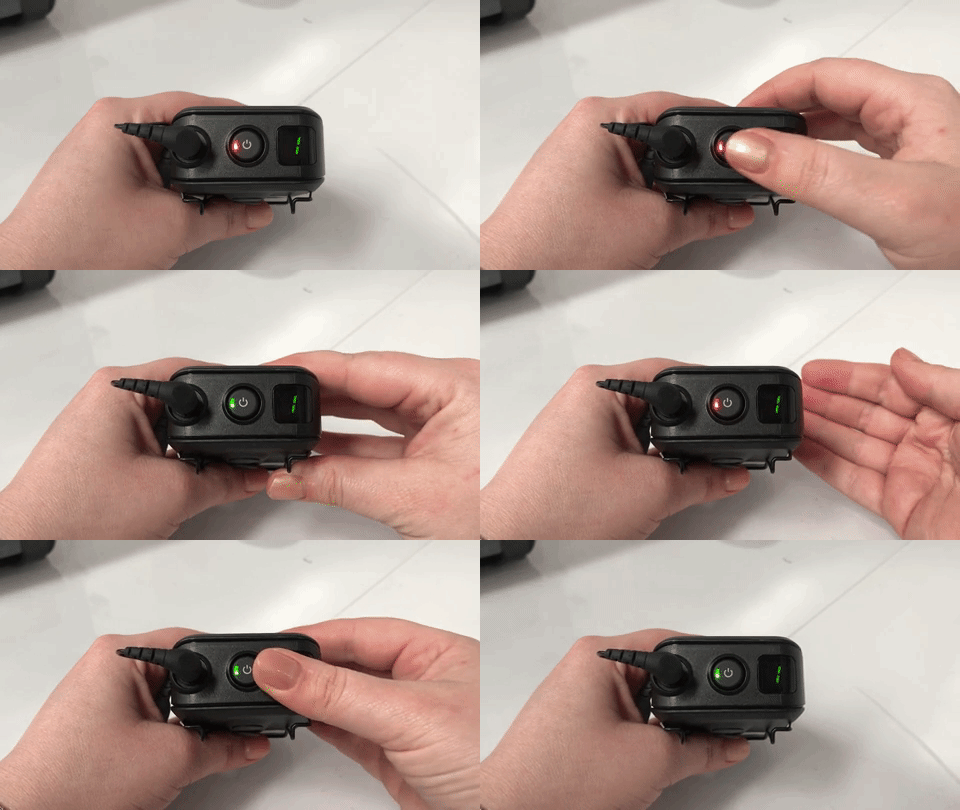
Both your Receiver and Transmitter can be muted by pressing the mute button on the Receiver or the power button once on the Transmitter. They will not capture audio whilst muted. If you are ready to record and see the colour red on either power buttons, press the mute button (RX) or the power button (TX) to unmute.
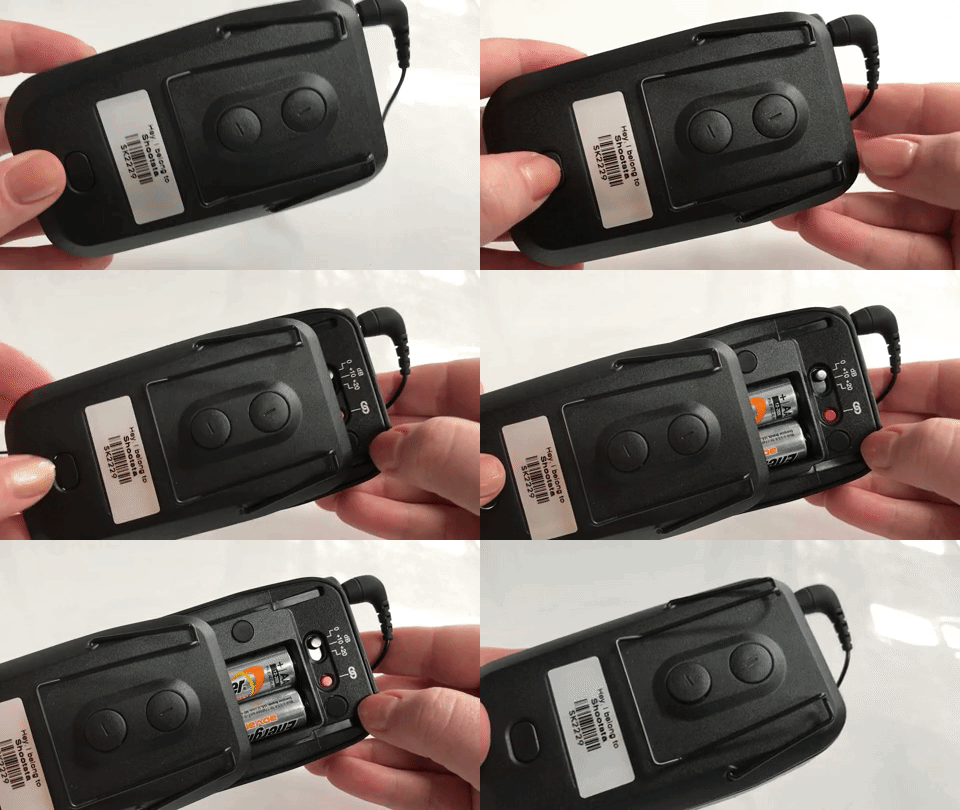
Changing the Batteries
Your Receiver and Transmitter take 2X AA batteries each. If your batteries are low, it can cut audio out or turn off the RX / TX altogether.
-
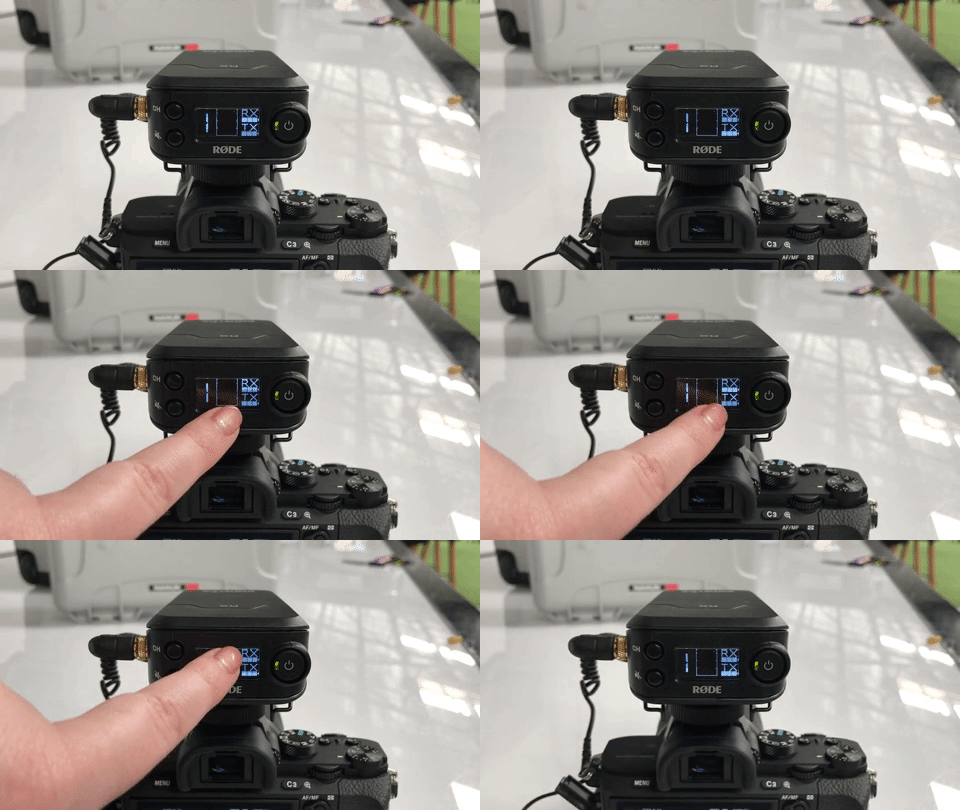
Check battery life on the Receiver screen. You will see the battery bars under RX & TX.
-
Prepare to change batteries on two bars or less.
Pairing your RX and TX
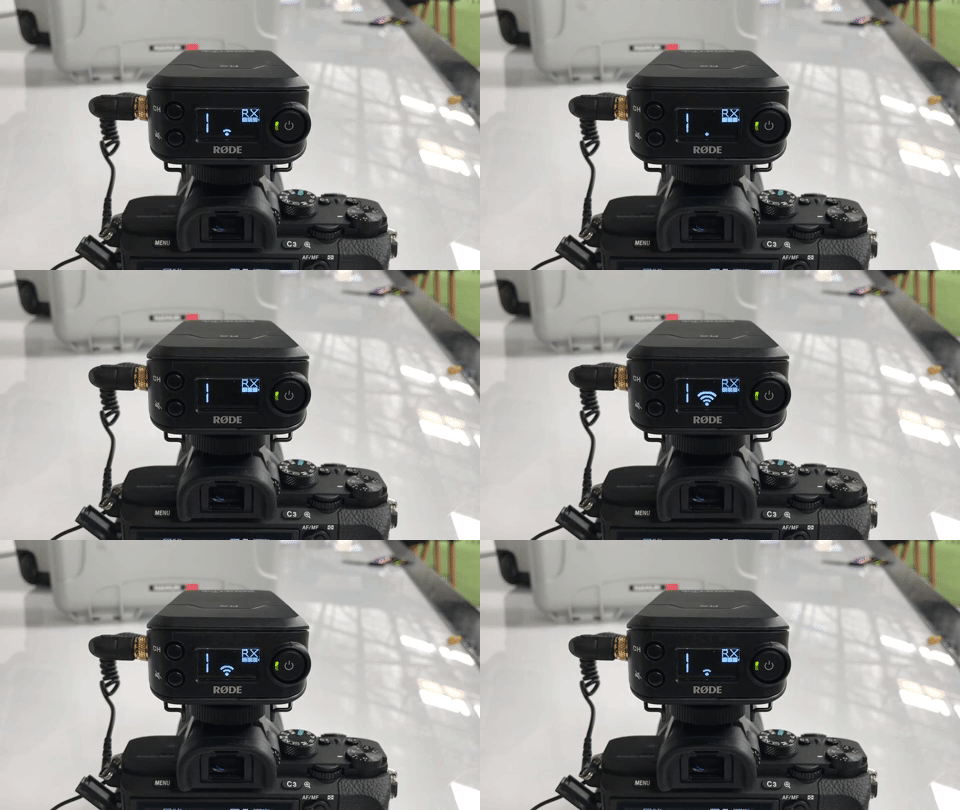
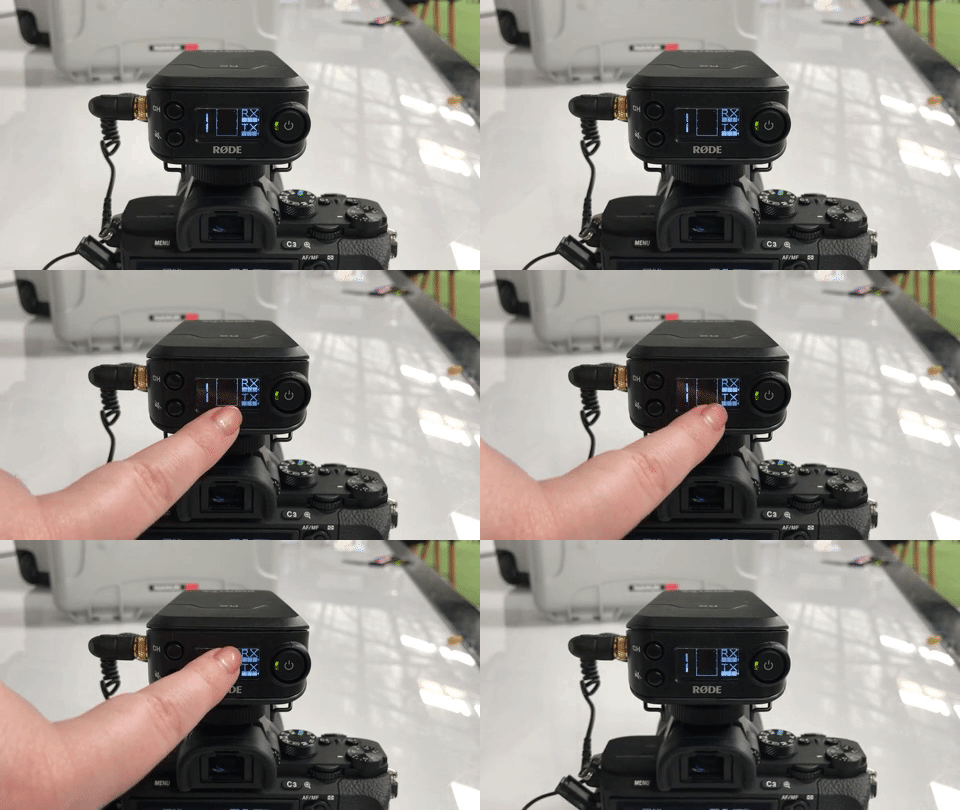
Your Receiver and Transmitter must pair in order to transmit the audio from the mic and record into the camera. Once you have held down both power buttons on RX & TX:
-
Check the receiver screen, RX (receiver) should search for TX (transmitter)
-
Once RX & TX have paired they will both appear on screen
Resetting Pairing Mode
-
Turn on the Receiver and Transmitter units.
-
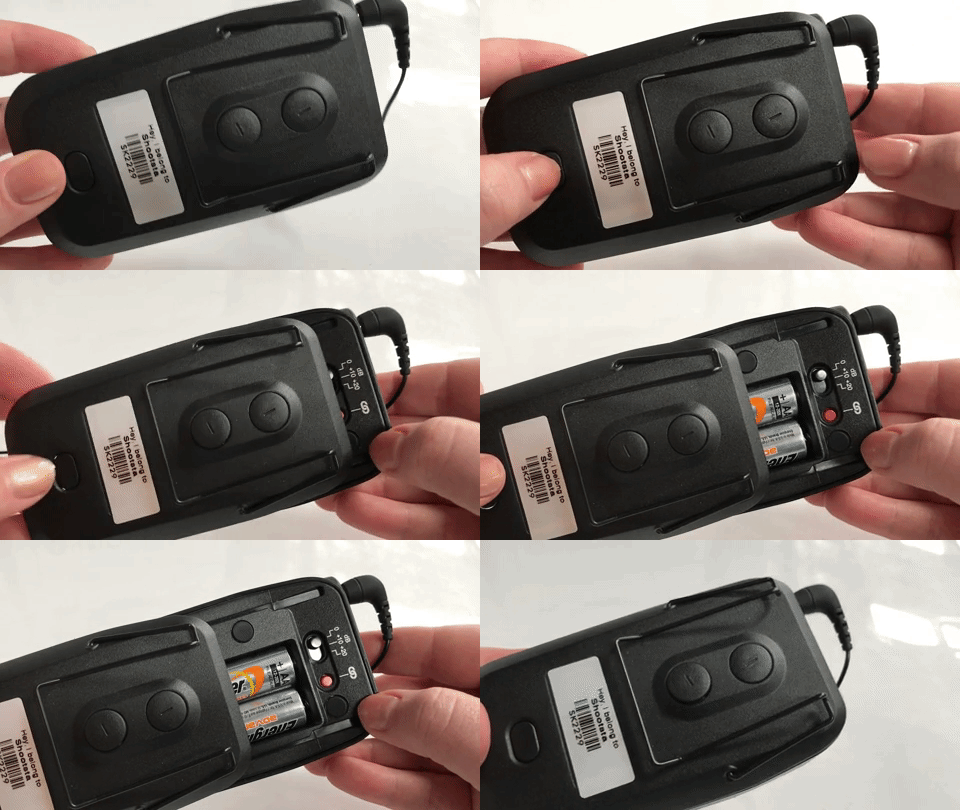
Open the battery door of both units, allowing access to the pair (red) buttons.
-
On the Receiver unit, press the pair button. The screen status should change to display a flashing channel number and a searching animation to indicate it is in pair mode.
-
If you wish to select a specific channel number, immediately press the 'CH' button to cycle through to the desired channel.
-
Press the pair button on the Transmitter.
-
Both units should now display a solid, matching channel number indicating that they are now paired.
-
Test further by pressing the power button on the TX once (do not hold down). This should turn the ring around the button red, indicating you've muted it. A mute symbol should appear on the RX screen at the same time. Press again to unmute.
Audio Recording Levels - No Sound Or Distortion
Your Audio recording levels determine how quiet or loud your video recording is. Adjusting your Audio Recording Levels will change how your videos audio sounds.
Increasing or Decreasing Volume - Avoid distortion
-
Press the Center Button on your camera
-
Press or turn the wheel to adjust recording volume
-
Check green bar levels , the ideal volume should have them going up to the -3 marker, never in the red
-
If your green bars enter the red zone, your audio will be distorted and not usable, in which case you should turn the levels down
Decibel Level - Transmitter
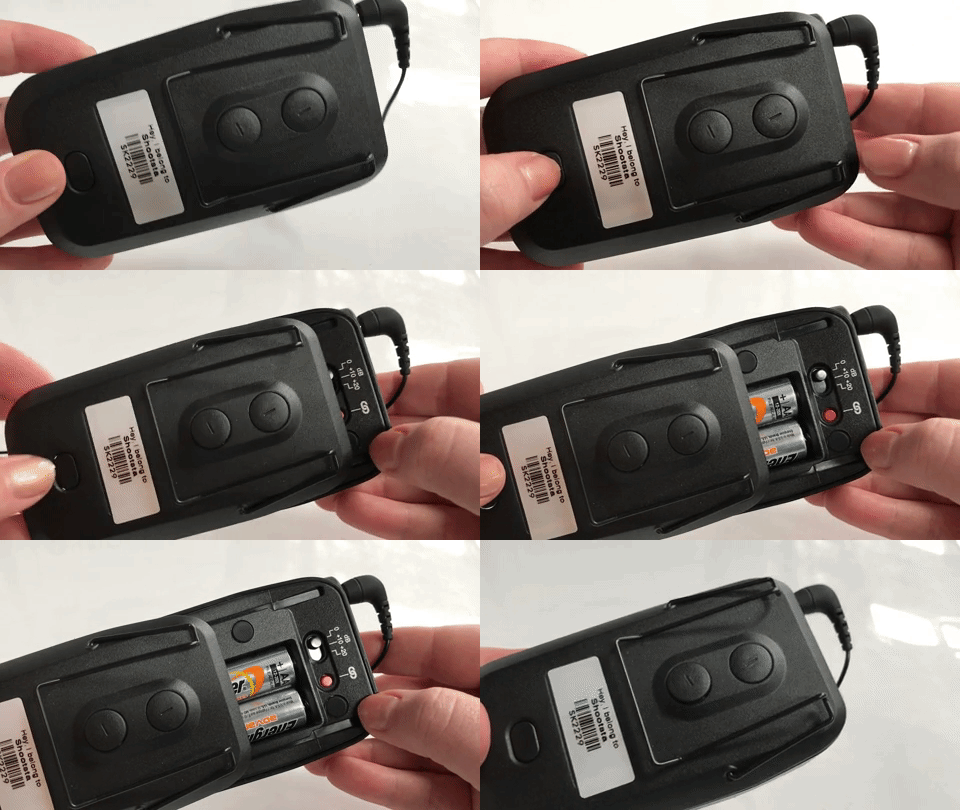
The decibel level should be 0 by default.
-
Open the back of the TX by pressing the bottom button and sliding
-
Check your decibel level is 0
Playback Audio - Playback Volume Settings
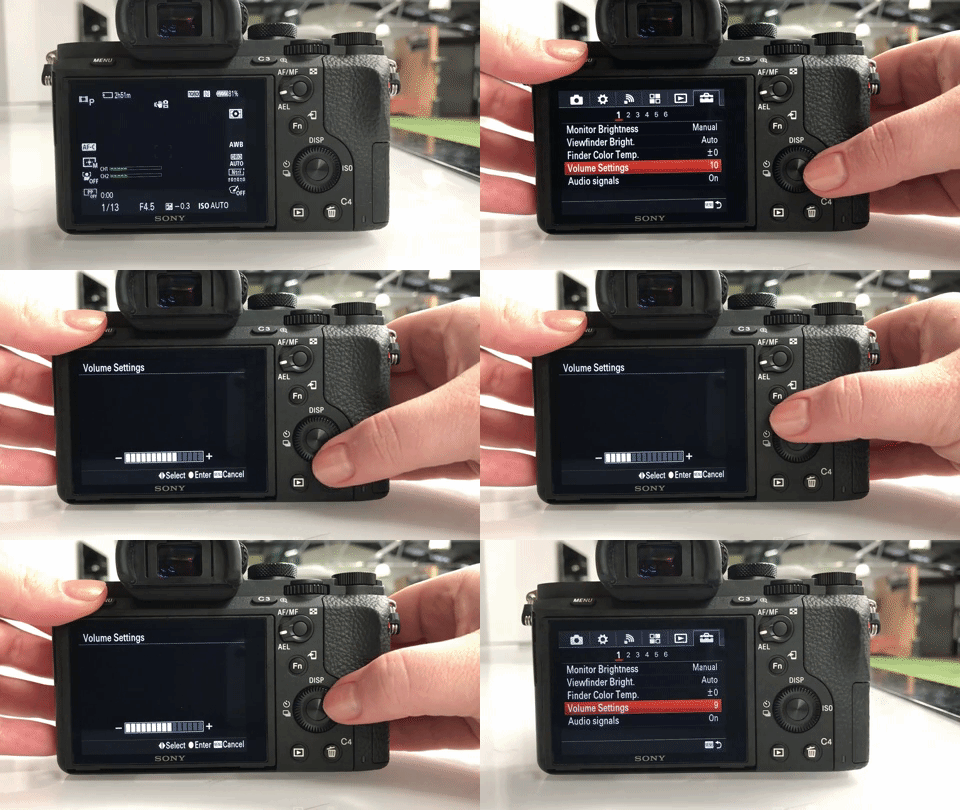
The playback volume settings effect what you hear when you playback a video. Don't panic! your camera may have recorded audio and your playback volume is off or low.
-
Go to Menu > Suitcase Icon > Page 1 > Volume Settings
-
Adjust your Volume Settings
-
Note that unless there is an SD card in the camera with footage recorded onto it, the Volume Settings option will be greyed out and inaccessible
Audio Signal
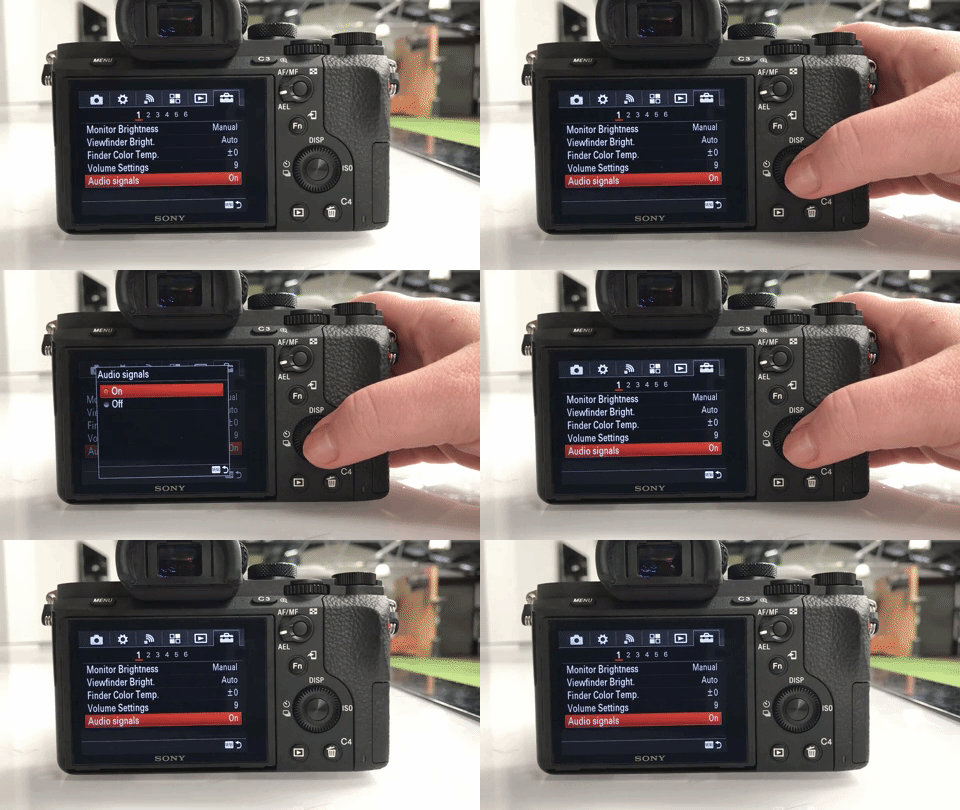
Audio signal decides whether or not the camera will produce sound. Very rarely this will be off, however, if someone accidentally turned off the audio signal in the camera here is how you find it and turn it on again. Press Menu > suitcase icon > Page 1 > Audio Signals
Eliminating Feedback
If you hear buzzing through your headphones whilst recording, it is likely one of these three causes:
-
The grey mic adaptor is touching the transmitter (TX). To fix this, simply move the adaptor so it's no longer touching the transmitter.
-
Remove any mobile phones away from the transmitter. This is only an issue if mobile devices are in very close proximity or touching the transmitter.
-
Listen to see if the feedback is coming through the camera or if it's actually ambient audio captured in the room. Feedback from projectors, PA's or other audio devices can give off feedback too so it is best to turn any of these devices off or move to a different location if you have identified the cause of the feedback.
Need help or have questions? Contact us. We'd love to help!
